I thought I had this all figured out, but lately my starter has been a little sluggish to start. Originally, I had been using the practice of discarding half of my starter and refreshing it with 4 oz. (by weight) of white bread flour and 4 oz. of water (by weight or volume, they are the same for water). My recipes call for 4 oz. of starter, so I figured, "Why throw out half? Just add 2 oz. of flour and 2 oz. of water to get the extra 4 oz. that my recipe needs."
Well, it seems that my starter is not so refreshed with that method. I decided to try an experiment. The week-old starter (since the last refresh and bread baking) that I had in my fridge was about 8 oz. I divided that into two containers of 4 oz. each. To one, I added 4 oz. of flour and 4 oz. of water. (The left container in the picture.) To the other, I added 2 oz. of flour and 2 oz. of water. The arrows are the levels at the beginning of the maturing process. The level in the left container is a bit obscured by starter that was stuck to the sides.
I set them out to grow for about 8 hours. Not much had happened by then.
I left them for another 12 hours.
It's not so clear from these views, but the container on the left has grown some. So has the second container, but not nearly as much. Opening the containers shows that the 4+4 refresh (left) is much more active than the 2+2 (right).
It appears the refresh needs a higher ratio of new ingredients to the old stuff. I might still be able to get away with a 2+2 refresh, but I might need to start with a smaller quantity of starter.
I've been having some disappointing results with my bread loaves, so I'm not going to try that experiment right away. I want to have a good loaf of bread.
Wednesday, April 1, 2020
Monday, January 28, 2019
Rye bread gets a new hair style
Remember the Pompadour hair style that my rye loaves used to always get?
I've found a solution. I simply need to use some milk in place of some of the water. Milk has some solids suspended in it, so I can't make a one-to-one substitution. I've been using this recipe, lately.
Now, my bread comes out looking like this:
That's a much more attractive hair style for a loaf of bread.
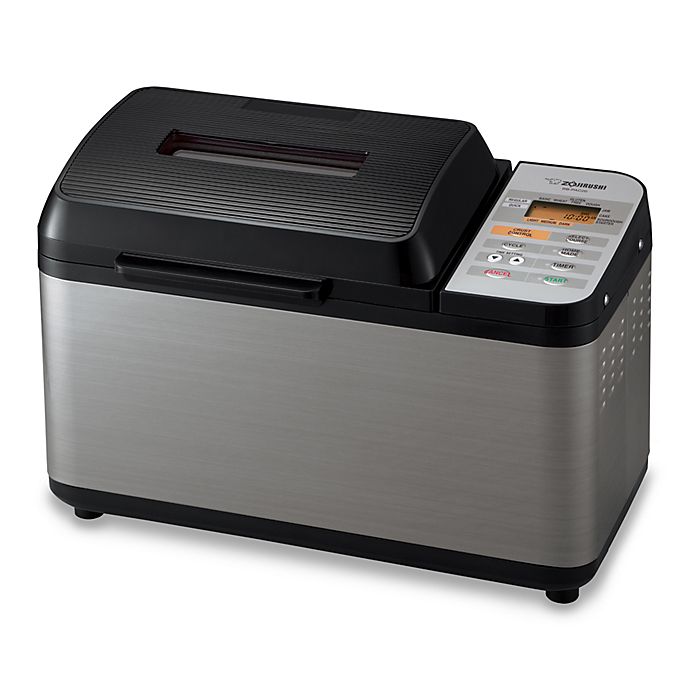
In other news, my bread maker started acting up. It's motor seemed to be straining. Fearing a fire, I replaced my bread maker with this high-end Zojirushi model
It's rather expensive for a bread maker, but you only cry once when you pay for quality. It has a user-programmable cycle that I thought would be useful, but so far, I've only used the built-in whole wheat cycle. Both my whole wheat and rye recipes work well on that cycle.
The thing I like most about the new machine is that it has two mixing/kneading paddles. It does a much better job at mixing the dough. Another nice feature is that the spindles fill the wholes in the paddles, so baked in dough doesn't get stuck in the wholes, making them difficult to clean. The only drawback is that my recipes are for 1-½ pound loaves, so my bread comes out kind of long and short. I could adjust my recipes for 2 pound loaves, but I would not eat it before it goes stale or moldy.
Rye Bread without
Pompadour
|
|
Remove 4 oz. of
starter from the fridge. Add 4 oz. of white flour and 4 oz. of
water. Set in a warm place for about 8-12 hours until it doubles
in size. Then, add
|
|
Water
|
4 oz.
|
Milk
|
4 oz.
|
Salt
|
1 tsp
|
Caraway seeds
|
1 Tbl
|
Oil
|
2 Tbl
|
Vital gluten
|
2 tsp
|
Rye flour
|
2 Cup
|
White bread flour
|
1 1/3 Cup
|
Now, my bread comes out looking like this:
That's a much more attractive hair style for a loaf of bread.
In other news, my bread maker started acting up. It's motor seemed to be straining. Fearing a fire, I replaced my bread maker with this high-end Zojirushi model
The thing I like most about the new machine is that it has two mixing/kneading paddles. It does a much better job at mixing the dough. Another nice feature is that the spindles fill the wholes in the paddles, so baked in dough doesn't get stuck in the wholes, making them difficult to clean. The only drawback is that my recipes are for 1-½ pound loaves, so my bread comes out kind of long and short. I could adjust my recipes for 2 pound loaves, but I would not eat it before it goes stale or moldy.
Wednesday, April 4, 2018
Carried Away with Caraway Seeds
There is no question that rye bread is better when it contains caraway seeds. I wouldn't think of making it without them. They are, on the other hand, kind of pricey. At first I bought the seeds in the normal McCormick spice rack.
This little jar is a little under an ounce and costs $5.99 at my local grocery store. It was kind of fun to see the unit pricing sticker on the shelf. It showed that this spice costs $100 per pound.
My recipe calls for 1 tablespoon of caraway seeds for a loaf of bread. This little jar only contains about 4 tablespoons of caraway seeds. So, this crucial ingredient adds about $1.50 to each loaf of bread. That's not really a big deal. A loaf of bread lasts me a week, and the caraway seeds make the bread taste delicious. The annoying part was that I was always running out of caraway seeds.
I looked for a larger sized jar, but this was the only one in the normal McCormick spice section at the grocery store. Then, I wandered to the adjacent fancy "organic" spice section. I wasn't expecting any bargains here, but I did find a larger jar.
This jar is about twice the size, and surprisingly, even though this is McCormick's "Gourmet Organic" caraway seed, it is only 20 cents more than the small jar.
Well, this solved my problem of the jar that only lasted for 4 loaves, and it brought the cost per loaf for this essential ingredient down to under a dollar.
Then, last week, I was shopping for something unrelated on Amazon. I needed to add about $10 to my order to qualify for free shipping. Well, I only had about a tablespoon left in my caraway jar, so I thought I'd look to see if I buy $10 worth of caraway seeds. Imagine my delight when I found this one pound jar of caraway seeds for $12.
I haven't tried these in a recipe, yet, but estimating that 1 tablespoon of caraway seed is about 1/4 ounce, I can make 64 loaves of bread with this jar. Now, my essential rye bread flavoring is only 19 cents per loaf.
That is your Home Economics lesson for the day.
You're welcome.
This little jar is a little under an ounce and costs $5.99 at my local grocery store. It was kind of fun to see the unit pricing sticker on the shelf. It showed that this spice costs $100 per pound.
My recipe calls for 1 tablespoon of caraway seeds for a loaf of bread. This little jar only contains about 4 tablespoons of caraway seeds. So, this crucial ingredient adds about $1.50 to each loaf of bread. That's not really a big deal. A loaf of bread lasts me a week, and the caraway seeds make the bread taste delicious. The annoying part was that I was always running out of caraway seeds.
I looked for a larger sized jar, but this was the only one in the normal McCormick spice section at the grocery store. Then, I wandered to the adjacent fancy "organic" spice section. I wasn't expecting any bargains here, but I did find a larger jar.
This jar is about twice the size, and surprisingly, even though this is McCormick's "Gourmet Organic" caraway seed, it is only 20 cents more than the small jar.
Well, this solved my problem of the jar that only lasted for 4 loaves, and it brought the cost per loaf for this essential ingredient down to under a dollar.
Then, last week, I was shopping for something unrelated on Amazon. I needed to add about $10 to my order to qualify for free shipping. Well, I only had about a tablespoon left in my caraway jar, so I thought I'd look to see if I buy $10 worth of caraway seeds. Imagine my delight when I found this one pound jar of caraway seeds for $12.
I haven't tried these in a recipe, yet, but estimating that 1 tablespoon of caraway seed is about 1/4 ounce, I can make 64 loaves of bread with this jar. Now, my essential rye bread flavoring is only 19 cents per loaf.
That is your Home Economics lesson for the day.
You're welcome.
Sunday, March 4, 2018
Sourin' the Rye
My sourdough rye bread recipe has been working very consistently, so I figure it must be time to tinker with it.
I read a scholarly article about rye flour and what sourdough does to make it better for making bread. It's got something to do with preventing enzymes from breaking down the starch into sugars.
With this in mind, I decided to try making my sponge with rye flour, instead of white. I don't know that that really has anything to do with the mechanism hindering the enzymes, but I was looking for something to experiment with. My sponge is now,
4 oz. (by weight) of sourdough starter
4 oz. water (1/2 cup)
4 oz. rye flour (3/4 cup)
I still use only white flour for maintaining my starter.
It starts looking like this:
Note that there is 1 oz. less water than in the link referenced above. I've found that the dough was a little too limp with 7 oz. of water. I need to adapt this recipe to the new sponge. At this point, I don't want to change any proportions, so I am just going to move 3/4 cup of rye flour from the bottom of the recipe to the sponge, and move 3/4 cup of white flour from the sponge to the bottom of the recipe. That leaves an awkward quantity of white flour in the last line. Putting my grade-school fractions to work, I find that I need 2-1/12 cups of white flour. One twelfth of a cup is 1 tablespoon plus 1 teaspoon. I don't think my bread is going to notice the omission of that odd 1/12 cup. My new recipe is:
The result...a fine looking loaf of bread. I'll tell you how it tastes, tomorrow. That was sort of the whole point here. I'm wondering if this change will make it taste more sour.
Update: It tastes good, but not noticeably different than the old recipe.
I read a scholarly article about rye flour and what sourdough does to make it better for making bread. It's got something to do with preventing enzymes from breaking down the starch into sugars.
With this in mind, I decided to try making my sponge with rye flour, instead of white. I don't know that that really has anything to do with the mechanism hindering the enzymes, but I was looking for something to experiment with. My sponge is now,
4 oz. (by weight) of sourdough starter
4 oz. water (1/2 cup)
4 oz. rye flour (3/4 cup)
I still use only white flour for maintaining my starter.
It starts looking like this:
and 8 hours later, it looks like this:
So, that looks like the yeast is happy.
My old recipe was
Ryer Rye Bread, Take 3
| |
Remove 4 oz. of starter from the fridge. Add 4 oz. of white flour and 4 oz. of water. Set in a warm place for about 6-8 hours until it doubles in size. Then, add
| |
Water
|
6 oz.
|
Salt
|
1 tsp
|
Caraway seeds
|
1 Tbl
|
Oil
|
2 Tbl
|
Vital gluten
|
2 tsp
|
Rye flour
|
2 Cup
|
White bread flour
|
1 1/3 Cup
|
Note that there is 1 oz. less water than in the link referenced above. I've found that the dough was a little too limp with 7 oz. of water. I need to adapt this recipe to the new sponge. At this point, I don't want to change any proportions, so I am just going to move 3/4 cup of rye flour from the bottom of the recipe to the sponge, and move 3/4 cup of white flour from the sponge to the bottom of the recipe. That leaves an awkward quantity of white flour in the last line. Putting my grade-school fractions to work, I find that I need 2-1/12 cups of white flour. One twelfth of a cup is 1 tablespoon plus 1 teaspoon. I don't think my bread is going to notice the omission of that odd 1/12 cup. My new recipe is:
Sour rye
|
|
Remove 4 oz. of
starter from the fridge. Add 4 oz. of rye flour and 4 oz.
of water. Set in a warm place for about 6-8 hours until it doubles
in size. Then, add
|
|
Water
|
6 oz.
|
Salt
|
1 tsp
|
Caraway seeds
|
1 Tbl
|
Oil
|
2 Tbl
|
Vital gluten
|
2 tsp
|
Rye flour
|
1 ¼ Cup
|
White bread flour
|
2 Cup
|
The result...a fine looking loaf of bread. I'll tell you how it tastes, tomorrow. That was sort of the whole point here. I'm wondering if this change will make it taste more sour.
Update: It tastes good, but not noticeably different than the old recipe.
Monday, October 16, 2017
The Spores and the Stone
I wrote a couple of weeks ago about my battle with tiny mold spots on my rye bread.
I had been storing my bread in a one-gallon zip-lock bag, but by the end of a week, I was getting speckles of mold. I decided to try storing the bread in a paper grocery bag. That solved the mold problem, but the bread was stale in just a couple of days.
A web site suggested storing the bread in a cotton bag that they would be happy to sell me. I had a hemp bag from a pair of Earth shoes (yes, they still make those) that I bought a few years, ago.
I had been storing my bread in a one-gallon zip-lock bag, but by the end of a week, I was getting speckles of mold. I decided to try storing the bread in a paper grocery bag. That solved the mold problem, but the bread was stale in just a couple of days.
A web site suggested storing the bread in a cotton bag that they would be happy to sell me. I had a hemp bag from a pair of Earth shoes (yes, they still make those) that I bought a few years, ago.
That worked a little better than the paper grocery bag, but still, by the end of a week, I had a rye flavored rock for the last few slices. Not only that, but the bag was just a little bit bigger than my loaf of bread, so getting it in and out when the loaf was new was a problem.
This week, I am going to try a hybrid approach. I just baked a loaf of bread, and I wrapped it in a cloth dish towel. I plan to keep it there for a couple of days, but a the first sign of staleness, I'm going to put in in a zip-lock bag. Stay tuned.
Sunday, October 8, 2017
Mr. D's Coffee Cake revisited
This post is not related to sourdough. I described in a previous post, a coffee cake made by my college fraternity's cook, Mrs D. The original recipe has a step involving a butter, sugar, and cinnamon, mixture with which I've never been quite clear about what to do.
Those last three ingredients go on top of the coffee cake, but do I put them on before baking? Do I melt them to make a glaze? If so, do I put that on before or after baking?
I've tried it just about every way. None of them have quite matched my memory of Mrs. D's coffee cake. I have found that putting it on top of the batter, makes the cake gooey. This time, I decided to save this sandy mixture until the cake was baked and just sprinkle it on top.
Astute readers have probably noticed that there aren't any baking instruction in the above recipe. My original copy of the recipe said to bake for 30 minutes at 350 degrees. The middle never seems to be cooked when tested with a toothpick. The same was true for this batch. I immediately put the cake back in the oven for another 10 minutes.
Sprinkling the second mixture on top after baking is the closest that I've come to my memory Mrs. D's coffee cake. However, all of that crumbly goodness falls off when I eat a piece.
Next time, I'm going to try putting the whole shebang back in the oven for a minute or two after I sprinkle. My next try at this recipe is going to be
|
Mrs. D’s Coffee Cake
|
|
|
Cream these items together
|
|
|
Sugar
|
1
Cup
|
|
Butter
|
2
Tbl
|
|
1
Egg
|
|
|
Add to that mixture
|
|
|
Milk
|
1
Cup
|
|
Flour
|
1
½ Cup
|
|
Salt
|
½
tsp
|
|
Baking
Powder
|
2 tsp
|
|
Pour into a well-greased 9x9 baking pan.
|
|
|
Cream the following ingredients together until all
of the butter clumps are gone.
|
|
|
Sugar
|
½
Cup
|
|
Butter
|
1
Tbl
|
|
Cinnamon
|
1
Tbl
|
Those last three ingredients go on top of the coffee cake, but do I put them on before baking? Do I melt them to make a glaze? If so, do I put that on before or after baking?
I've tried it just about every way. None of them have quite matched my memory of Mrs. D's coffee cake. I have found that putting it on top of the batter, makes the cake gooey. This time, I decided to save this sandy mixture until the cake was baked and just sprinkle it on top.
Astute readers have probably noticed that there aren't any baking instruction in the above recipe. My original copy of the recipe said to bake for 30 minutes at 350 degrees. The middle never seems to be cooked when tested with a toothpick. The same was true for this batch. I immediately put the cake back in the oven for another 10 minutes.
Sprinkling the second mixture on top after baking is the closest that I've come to my memory Mrs. D's coffee cake. However, all of that crumbly goodness falls off when I eat a piece.
Next time, I'm going to try putting the whole shebang back in the oven for a minute or two after I sprinkle. My next try at this recipe is going to be
|
Mrs. D’s Coffee Cake
|
|
|
Cream these items together
|
|
|
Sugar
|
1
Cup
|
|
Butter
|
2
Tbl
|
|
1
Egg
|
|
|
Add to that mixture
|
|
|
Milk
|
1
Cup
|
|
Flour
|
1
½ Cup
|
|
Salt
|
½
tsp
|
|
Baking
Powder
|
2 tsp
|
|
Pour into a well-greased 9x9 baking pan. Bake for 40 minutes at 350°F
|
|
|
Cream the following ingredients together until all
of the butter clumps are gone.
|
|
|
Sugar
|
½
Cup
|
|
Butter
|
1
Tbl
|
|
Cinnamon
|
1
Tbl
|
|
Sprinkle on top of the cake after baking and put
it back into the oven for a few minutes.
|
|
Saturday, September 30, 2017
Spores
While "Spores" is a very entertaining song by John Forster (Listen here on Spotify), they are no friend to my rye bread. I've been having trouble, lately, getting through a week without mold finding its way onto my bread. This particular mold shows up in tiny spots all around the loaf.
This week, I am going to try storing the bread in a paper bag. It might get stale, and for that matter, it will be exposed to more "spores in the air..." (You've listened to the song by now, haven't you?), but without the trapped moisture, maybe it will last the whole week. Stay tuned for an update. A new loaf of bread is still baking as I write.
Those little spots can be easy to miss for my eye, but my taste buds certainly notice them!
It's a shame to have to throw out any of this tasty bread, so I am going to try experimenting with my storage method. Up until now, I have been putting the bread into a gallon-size zip lock plastic bag--often while it is still warm. That leads to some moisture in the bag that keeps the bread from going stale, but also promotes the growth of SPORES.
Maybe it's the season. I hadn't seen this problem during the summer, but lately it has been happening to every loaf before it is a week old.
Update (four days after baking)
Well, so far, I haven't seen any mold, and the bread is getting stale. I did find this helpful website that discusses how to store homemade bread. It turns out that their site is also about sourdough, even though I just searched for "bread storage" or something like that. It talks about the need for air to circulate. I might try a cloth towel next week, or maybe a cloth bag that I have.Second update (almost a week after baking)
By the time I finished eating the loaf, it was pretty stale. So, the paper grocery bag isn't the answer. This week, I am trying a drawstring hemp bag that a pair of shoes came in. If that is sort of successful, I might try our local kitchen gadget shop, The Concord Shop, to see if they have something suitable.
Subscribe to:
Posts (Atom)